Tuesday, December 6, 2011

Deck the Halls

We spruced up our hallway!  Finally!  When we moved into our house in April several projects immediately went on a to-do-this-year list.  One of those things was making the hallway a prettier place.  The walls needed some serious patching and a complete paint job, ceiling included.  Two weeks ago Aaron and I had a discussion about what projects we wanted to tackle before the end of the year and this was the first thing that came to mind.  We actually picked out and bought the paint months ago (September!), but just never got around to doing the job until this week.  So a couple of Sundays ago we pulled everything off the walls, moved the bookcase to another room and got to work.  No more beige hallway (and ceiling) for us color lovers!


The first thing we needed to tackle was sanding down and patching some bulges in the wall.  The previous owners had a large armoire bolted to the wall (earthquake preparedness) and when they pulled all the hardware and straps out they left gaping holes with bulges along the edges for us to deal with.  Additionally, we had central heat and AC installed in May and that required the work crew to cut two holes in the hallway ceiling, one for a larger access hole to the attic and one for the intake vent.  The too-thick (and beige) paint peeled and cracked away in sheets around the opening when they cut and pulled out the vent hole in the ceiling so not only did it need new paint, it needed some patching as well.  There were several other places on the walls that needed patching due to what I believe was improper curing of previous paint jobs and sloppy patch jobs from the past.  We did an initial sanding to smooth down the bulging spots so they would be even with the wall once we patched and re-sanded them.  Then we mixed up a batch of extra strong all-purpose putty and went to work filling holes in the plaster and evening out gouged surfaces.

It's been chilly lately.  Seriously.  Chilly like we-keep-our-thermostat-set-to-57-degrees-and-the-heater-has-kicked-on-quite-a-bit-in-the-last-couple-of-days chilly.  This meant that it took several days for the patching putty to dry completely, but when it finally did we were able to do a second sanding to smooth everything out and then we were able to move on to painting.


We started with painting the ceiling.  When painting I like to start from the top so any drips don't ruin fresh work down below.  We chose a pretty basic white with a slight hint of silver to it as it was the closest I could come to matching the other ceilings in the house.  It is Behr's Silver Dust.  We wrestled with whether we should prime it before painting, but in the end we decided not to and the paint covered everything just fine.  At this point we also primed the walls with a dark-base primer to prep them for the vibrant color treatment they would soon receive.  We didn't opt for the color-specific tinted primer on this one since the walls in the hallway all have at least one doorway cut out of them. (Five doorways in a 6'10" x 6' hallway!)  It is such a small total area we didn't want to be wasteful and have a ton of color-specific primer left over.


As I mentioned earlier, we had chosen the wall color months ago.  (Well, I chose the color and ran it by Aaron to make sure he was in agreement.)  I knew I wanted a teal color (we have an orange bookcase residing in the hallway which I thought would look great with a medium teal backdrop) and my actual color choice came from a shirt of mine.  I simply took the shirt into Home Depot and started matching up paint chips.  I know I could have taken the simple route and had the paint color-matched to the shirt via the computer, but I love the hunt for the perfect color.  Anyhow, the paint went up                                                                                          really easily and looks great.


Unfortunately, since the temperature has been low-ish, our wall paint took a lot longer to dry than is normally the case.  After a couple days had passed and the first coat was still tacky, we set up a portable electric heater and closed all five doors so the hallway was as warm as we could get it.  Finally we were able to get that second coat up and this time we immediately set up the heater and closed off the hallway to get it to
dry more quickly than the first coat.  Painting was the end of the original plan, but since re-doing the dining room and seeing the difference crown moulding made, Aaron decided he wants to add crown moulding to each room as we spruce them up.  (I completely agree!)  Luckily we live near a Home Depot (the contractor set-up) and they have a huge selection of cut-your-own moulding.  Since what was in the dining room wasn't actually ceiling moulding, but rather casing for windows and doors, we decided to just match that.  We opted for the pre-primed moulding and when we got home we were able to cut the moulding to the exact size and add in the 45° angles for the corners.  I had to let Aaron open one of his Christmas gifts early (an adjustable miter and saw set) so we could actually do the cutting properly and exactly.   After Aaron was finished making all the cuts I put on a simple coat of Behr's Ultra Pure White in a semi-gloss finish.  One coat did the trick since we bought the pre-primed stuff.  Most professionals paint moulding after putting it up, but I think it is so much easier to paint before.  Then, once it's up we don't have to worry about taping anything off or spilling trim paint on our newly painted walls.  Then we were able to get the trim in place and nailed up.  Once the trim was up all we had left to do was patch the trim where we nailed it to the walls, do paint touch-ups, and run a bead of caulk along the trim edges to give it the finished look. (We're actually still working on finishing up the caulking.)


We love this new burst of color right in the middle of our home.  It is so much more cheery than the drab beige that was there before.  And, as is always the case with our projects, it's not quite finished.  I have a lighting fix I'm working on.  I'm making the chandelier that was originally in the dining room smaller and we will switch out the 'boob light' that now occupies the hallway with the refurbished chandy.  I'm having trouble finding a lighting shop that carries parts at the moment, but once I get my hands on them that thing will be up in a flash!  A trip to Austin for Christmas may prove to be the answer to the lighting store problem, so keep your fingers crossed for me!

Monday, November 21, 2011

One Night Stand

Today I am celebrating.  I have a new nightstand!  That may not sound very exciting, but what I was using before was pretty shady (and that one's not a pun).  A few years ago I found a very small table that I loved, but had no use for and it became my nightstand.  I think plant stand might be a better name for it.  Are you getting how small it actually was?  Well, after not having enough room for the lamp and a book for a while I found a solution.  I decided that the glass from a large picture frame found at the GoodWill would suffice as a table topper and add several inches of space to every side.  The size was fine, but that's when the abusive relationship with the table began.  I cannot even tell you how many times I sliced my finger on the glass top.  (Like I said, shady.)  The photo is from our last house as I do not have any pictures of it in the new house, but it was the same setup; cute, but dusty and unsafe.


Well, after several years of that nonsense I finally decided to take matters into my own hands and build myself a new nightstand.  I know I could have bought one that looked exactly like it for cheaper than I made it, but making things is so much more fun!  I started by measuring out the space I wanted it to fill and then I put pencil to paper and drew up a quick plan.  Then it sat.  And sat and sat and sat, until one weekend I decided to pull the trigger and build the sucker.  I knew I wanted a bookshelf and nightstand combo and I had found this inspiration photo on Pinterest while the building plans sat and I knew precisely the colors I wanted to use for it.  Everything was ready to go.

Building it took very little time and Aaron and I had all the cutting and construction done the same afternoon we started.  We had some of the cutting done at the Home Depot so the materials would actually fit into the car and when we got home we just needed to measure to make sure it all had been cut properly.  Once we had the remainder of the cuts made, we pre-drilled some holes in the wood where the screws would go so the wood wouldn't split.  Aaron went the extra step and drilled some larger holes around the smaller holes so we could countersink the screws for a more seamless look.  Once that was done I screwed the sides together.  We should have used wood glue in the seams, but we thought we were going to take it apart at some point during the project so we skipped it.  (We never did take it apart so we didn't end up using any wood glue after all.)
 
Next we notched out the middle shelves with the jigsaw so we could slide the two together in a cross pattern.  We figured this would probably be the strongest way to deal with the middle shelves without adding too much unsightly hardware to the shelf.  Then we just slid the shelves into the sides and set up for some more drilling and screwing in order to secure the middle shelves in place.


Again, we drilled shallow large holes with deeper, smaller holes in the middle so we could countersink the screws.  Aaron has a great trick for drilling to specific depths.  He simply puts a piece of tape around the drill bit at the depth he wants to stop drilling so when the tape gets to the surface you are drilling, you know to stop.  Brilliant!  Since the wood shelves were not exactly straight we had to use the rubber mallet to bang things into place to line up the screws.  Aaron had to hold the shelves in place while I put the final screws in.
 The next step was adding some plugs where we had countersunk the screws for that seamless look.  Aaron simply cut some small pieces off of a dowel that matched the size of the hole and we used wood glue to secure those in place.  We purposely left the dowel pieces a bit taller than the surface of the shelf so I could come in after the glue dried to sand it all to a smooth finish. (That came later though.)  Finally, I stapled some 3/4" trim on the front and a large piece of very thin plywood on the back to finish up construction.


The last step of the day was to fill in all the holes and any seams that weren't a perfect fit with wood putty.  It had to dry overnight in preparation for a final sanding so we retired for the night.  That's when the rain set in.  The next morning when I got up it was raining and the forecast showed that the cool, damp weather was likely going to hang around the remainder of the week.  So I did what I could and got everything sanded.

My plans for painting went out the window at that point.  The humidity was too high for the paint to cure properly and I did not want a sticky and peeling paint job.  So again, it sat.  We finally had a few dry days last week and I got it all primed.  After that dried for a day or so I was able to move on with the project.

At some point during the planning process I had sourced and priced gold leaf and found that it was prohibitively expensive so I formulated (and moved on to) Plan B.  The knobs on my dresser are partially made from antiqued brass so I decided to go the metallic spray paint route and I chose a color called Burnished Brass from the Rustoleum Metallic Collection.  The first can ran out mysteriously fast so I took it back to the HD and explained the situation.  They allowed me to switch it out with a new can, no questions asked, and I was on my merry way.  I wanted to take advantage of the dry weather so I laid on a light and then a wet coat, as directed by the manufacturer, with horrible results.  I thought maybe once dry it would look better.  I was wrong.

I went out the next day to find a splotchy, uneven paint job.  I looked online to see if anyone else had had similar problems with this particular paint and found that for some a third coat did the trick.  I sprayed on my third coat and hoped for the best.  It was not better.  The metallic bits had a shiny finish in some place and a matte finish in others.  I was pretty upset at this point so there is a lack of photos for this part of the project.  Since the brass paint was only for the inside of the shelf I decided to put my frustration aside and move on to the front edges, top and sides of the shelf.

The previous owners left around 30 cans of paint in the garage when they left; however, many of the cans had never been resealed after use and were completely ruined and rotten.  One of the few remaining cans was a quart of dark teal paint in a satin finish that I have used for a few other projects around the house already.  The color is Dark Fern by Behr.  I think it was left by the owners before our previous owners as nothing in the house was painted that color and it was actually sealed up properly before it was stored.  Fortunately, Behr never lets me down and the first coat went on flawlessly.  I waited the proper amount of dry time in between coats and got a second coat on that evening, finishing up that portion of the project.

There was one more tool in my arsenal I had yet to try for the inside of the shelves.  Once again, I went to the menagerie of things left by the old owners and came up with a can of gold spray paint.  With a last ditch effort I sprayed on a coat over the failed attempt at brass spray paint and to my surprise it didn't look completely horrible.  It had covered a lot of the splotchiness, but the weird sheen dilemma remained.  I let that dry and sprayed one more coat.  Again, more splotchiness gone, but still the shiny/matte sheen problem.  After some strong reasoning with myself,  I came to the conclusion that no one would notice the sheen problem since it was on the inside of the shelves, which I would eventually fill with book and such.  Plus, it would be in the far corner of the bedroom so many people would never even see it anyway.

I am happy to report that it is dry and inside, functioning wonderfully!  It came out pretty close to what I had envisioned so I'm calling it a success.  To be honest I actually prefer the light look of the other table to the heaviness of the new shelves, but this new nightstand is so much more functional (and less abusive) than the original.  I also found a new lamp in September so the purple lamp was passed to Aaron's side of the bed and I got the more girly of the two.  I'm sure you can also see that two of the four shelves are empty, but that won't last long as we almost always have more books than shelf space.  They will be full before you know it. 
I will forever be on the lookout for cheap gold leaf.  Some day I know I'm going to come across a sale rack and spot it, gleaming out at me from under a pile of scrapbook stickers.  I will bring it home and finish this project once and for all.  But until then, I have a new nightstand!

Tuesday, November 15, 2011

Skeletons

A few months ago Aaron and I started discussing revamping our master bedroom closet to better suit our needs.  Our bedroom closets are fairly large, but the way they were set up was just not working for us.  So I drew up some rough plans and Aaron thought nothing more of it.  Then the weekend came.  Aaron was supposed to go climbing, but that plan fell through at the last minute and we suddenly had an entire weekend with absolutely no plans.  We knew we wanted to tackle a house project and when Aaron suggested the closet project I was immediately on board.

We did some measuring to confirm my plans and then headed to the Home Depot for supplies.  We decided to use a high-grade plywood for the shelving unit we had in mind after being very pleased with it the previous weekend when we used it to build something else.  We also needed to pick up 3/4" trim for the exposed edges, tracks so we could have adjustable shelves, new and slightly longer hanger rods, and a shelf to span the back wall on top of the shelving unit and rod brackets.  We reused the rod brackets from the old set-up so we didn't need to buy those.  We knew we would have to go to the HD with a cutting plan since we had no way to get the whole 8' x 4' piece of plywood home.  We had them cut out the side panels for the shelving unit and cut the remainder of the board in half so we could fit it in the car. 

When we got home we went to work on another project and almost finished it (the wood was too wet to paint, so that project is on hold until the wood dries out).  Since we had the saw out we made a few cuts for this project, including notching out the bottoms of the side panels to fit around the baseboards.  Aaron also took the time to sand down the edges of the plywood before we called it a day.  I don't know what Aaron had in mind, but at the rate we were going I didn't think our closet would be complete in only one more day.

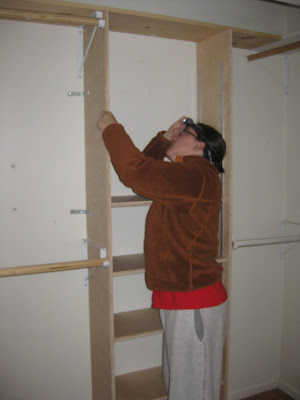
The next morning Aaron and I went right to work with the closet (mostly Aaron though).  I emptied out all of our clothes while he removed the old bars and hardware.  We had some other errands to run, but he convinced me to let him keep working before we headed out.  He got the new bars put up, the track tacked on to the insides of the side panels for the shelving and before I knew it he was asking me to help him hold the side panels in place so he could attach them to the wall.  He used some L-brackets we had laying around to hold the ends of the side panels to the wall and to straighten out any non-square issues with the plywood. 


We ran our errands next, but when we got home we used the leftover plywood to cut out shelves.  Amazingly, we were able to use every single piece of the plywood board for this project and needed no more nor less.  I sanded the edges of the shelves while Aaron finished cutting them out and when he
                                                                                        finished that he wiped down the shelves.


Yes, I'm using a headlamp to put in the clips for the shelves; that's because we have no closet light.  That is another project we have to look forward to.

We may end up painting this at some point, but for now I think we are both happy with the exposed wood.  Plus, who want their closet and clothes to smell like paint?  The project isn't officially complete as we have yet to  put up the trim on the

rough edges of the shelves, which aren't so rough any longer (since I am a master sander), but which have black typing on them.  When we get to it we will glue the trim down with wood glue and use painter's tape as a clamp.  If that fails we will have to bite the bullet and put in staples, making it more likely that we will paint the whole shelving unit.
All in all, we actually saved quite a bit of money making it ourselves and we ended up with a custom design for our closet rather than a factory-made system that didn't quite fit the exact dimensions.  We are both really excited to have a functional closet (we were really lucky in the first place to find an old house with closets as big as they are) and are already planning a closet makeover for the second bedroom!

Sunday, November 13, 2011

Hanging Out

Strange as it may seem, I love doing laundry.  I love the smell of clean clothes and the warmth of just-dry garments.  I love how line-dried things have a crispness that can't be imitated.  So it should come as no surprise that one of the very first projects Aaron and I talked about when we bought our lovely house was the installation of a DIY clothesline.

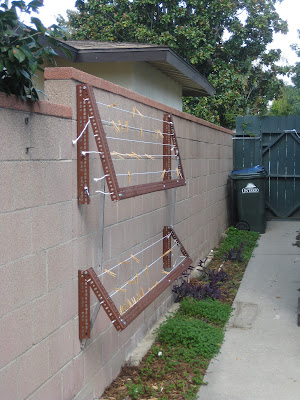
The way our backyard is laid out was making our decision on where to place the drying line a bit of a conundrum.  We didn't want to divide the grassy area into different parts and we didn't want to obscure the view of the pretty plants and flowers bordering the lawn.  We also needed to make sure we didn't block the paths to our vegetable garden, our back patio, or the covered porch and gardener's shed.  For many months we were left scratching our heads, but enough tipped-over-portable-drying-rack mishaps led us to a major brainstorming session.  Aaron eventually came up with the idea to attach a folding-arm system to our masonry wall on the side of the house.

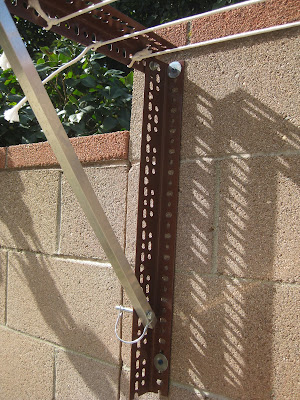
As many of you know, we were left with a strangely large menagerie of 'left-overs' from the previous owners of our house, including hardware, furniture, and lumber, among other things.  After browsing through our collection of misfit pieces, we decided on some perforated angle iron (I think that's the technical term for it anyway...) to get our project going.  Aaron took the reins on this project and from there on the only thing I did was help with some rust-proofing.

Before I knew it Aaron had the plans drawn up and most of the metal cut.  We weren't able to source all of our project materials from the 'left-overs' so a trip to the Home Depot was next on our list.  (We love going to the hardware store!)  More cutting and the temporary construction ensued.  We needed to seal the metal so after all the pieces were cut and put together we took it all apart and readied it for painting.

The metal we were using was pretty rusty, so a thorough sanding and several coats of a rust-proofing paint was the next step.   (Afterwards I read on the paint website that a light sanding is plenty of preparation for the specific paint we used, but at least we got a good workout; sanding rusty metal to a pseudo-shine is hard!)  After the paint had plenty of time to cure our friends Mike and Ren came over and Mike helped Aaron hang the contraption.  I hung the line and used it a few days later.


On first using it we figured out a flaw in the plan.  The weight of the wet clothes was pulling the arms together (and out of square).  We needed to devise a way to add some lateral rigidity between the arms.  We quickly realized that another piece of the angle iron across the front would provide just the rigidity we needed.  A quick sanding and some more painting were completed and the arms were attached.


The clothesline now functions perfectly!  My favorite part of the whole thing is that the racks fold down when not in use.  They are also placed against a wall which means they are using a space that would otherwise have been unused.  The masonry wall also provides a source of natural heat that helps the clothes dry even faster!  The lines are also just out the back door which is right next to the laundry area inside; I can easily move between the washing machine and clothesline.  You can now count me as one happy laundress!

P.S.- Don't pay attention to the explosion of weeds that occurred when we went on a week-long road trip.  They've taken over the whole yard!

Saturday, November 12, 2011

Backyard Bonanza!

So I started writing this post in June after a couple of visits from Aaron's mom, Robin, and then Aaron's dad, Steve.  I admit, I dropped the ball on this one.  There was just so much change taking place in our backyard that I wanted to wait for the finished project to post about it.  I have finally learned that a backyard is never officially done.  There is a continual change taking place at all times.  That's nature, right?  So I'm going to post a bunch of pictures of a few yard projects we've tackled in the time between June and now.


First up is a small-ish project I attacked on my own.  I simply dug out a small garden running along the patio off the back door.  I only got about halfway done when I realized the soil was probably not the best place to try to grow anything without some major amendment.  Once the second project I'm about to tell you about was complete I went back to this one and got it finished out and planted a bunch of volunteer tomato plants there.


Second on the list was the back corner vegetable garden project.  When Robin was here visiting in May (a time we like to call Gardenstravaganza) we did our first major weeding of the yard and flower beds.  We also bought a tiller and started getting our future garden dug up and amended.

We are totally unlucky in the soil department here; ours is very hard packed and super dry.  When watered, the water runs off or just sits on the top rather than soaking in so some major work was needed to prepare for the veggies, fruits and herbs.  Robin got us started with some plants that I planted after she had gone.  While she was still in town we also mulched many of the flower beds with cedar mulch.  If you look carefully in the first picture you can see what a mess the back corner of our yard was.


Before planting the veggies and herbs I needed to build a short retaining wall as our garden site was on an incline.  The previous owners left us a large stack of bricks so I planned on using those to build the wall with.  I dug out what would be the lower level and made sure it was level before I set the first row of bricks in.  After that I just  staggered the brick placement and waited for Aaron to get home.


I knew we needed a way to hold the bricks together, but I really didn't want to use mortar, so I hoped Aaron would have something better in mind.  We  didn't come up with much on our own, but a quick trip to the Home Depot revealed a new favorite product: masonry epoxy.  It comes in a caulk-style tube that we popped into our caulking gun and went to work with.  Our wall was glued together in no time and the best part is that water has a path to run through rather than being held in the upper level of the garden which may have been the case with mortar.  I quickly got the plants in the ground and our garden was ready to grow!

Soon to come: a current picture of the garden all planted up!

The third project to report is one that Steve helped us with when he was visiting in June.  When we moved into our house there was a large sand pit framed out in the backyard that we were told was an abandoned project.  The former owners had planned a brick patio (which was why there was a huge stack of bricks left in the backyard), but we had other plans for the brick and wanted a different style of patio.  For the first couple of months all the cats in our neighborhood used the sandpit as a large litter box so we knew we needed to get something put in quickly.

I had chosen a few inspiration pictures from Pinterest and we knew we wanted to incorporate square pavers, pebbles and a fire bowl like these:

 I sourced the large 24" square pavers, but they were pretty expensive compared to easy-to-get 12" square pavers from Lowe's.  We eventually decided to top our cinderblock bench with the large pavers and opted for the 12" pavers for the ground cover filled in with river pebbles.  Once I had a plan drawn out we borrowed Aaron's company truck (with a lift gate!) and made a one-stop-shop at Lowe's to purchase the cinderblocks, pavers and pebbles.

When we got back home with our materials  Aaron and Steve got to work leveling and tamping the sand to form our base for our new patio.  I think it is appropriate to mention here that below the sand was the black blocker material and a layer of concrete rubble.  We were spared a lot of work with that already being dug out and in place for us.  I began unloading the cinderblocks from the truck and was about three quarters of the way done when our friends Ren and Mike showed up to help! (Yeah, we owe them big time!)  Mike went back to join the guys while Ren and I finished getting the cinderblocks out of the truck bed and then to the backyard.

 
Once the sand was level and ready the first layer of cinderblocks went down.  Again, we used our miracle masonry epoxy to affix the second layer of blocks to the first and the 24" pavers to the top.  While Mike and Aaron built the bench  Ren and I brought the 12" pavers to the backyard and Steve laid the 12" pavers in a simple hatch pattern on the sand. Finally we filled in the blank space with the pebbles and swept them into place.  It was tough work, but we all had a good time and the patio we have to enjoy was well worth it.


We had decided not to make a fire bowl out of concrete after going back and forth for a while prior to the start of the project.  I loved the look of it, but it just didn't end up being very practical for us.  Some cons were that we probably couldn't lift it to empty the ashes into our compost heap and most tutorials said that the wood shouldn't directly touch the concrete while burning and we couldn't see a way around that.  So it was back to the drawing board.  My second choice was purchasing a 30-quart stainless steel salad prep bowl from a restaurant supply store.  That idea was put on hold until Robin came back to visit us and prompted a trip to the restaurant supply store.  Once there we found a large steel wok with handles that was much cooler than a salad bowl.  Robin treated us to the wok and some piñon wood for our first backyard fire. 

Coming soon: A picture of the completed project.

Overall, our garden this year included:
Basil
Dill
Mint
Cilantro
Oregano
Rosemary
Lemonbalm
Chives
Onions
Bell Peppers, red and yellow
Jalapeños
Serrano Chiles
New Mexico Chiles 
Purple Table Grapes
Plums
Apples
Avocados
Persimmons
Blueberries
Pumpkins, although a large first batch of them died a while back and now I've got two new plants exploding with growth, but no fruit yet.
Tomatoes, Mr. Stripey, Celebrity, Black Prince, and volunteer Romas and the on-the-vine variety from the store.  We also have a cherry tomato plant that has just started growing and has some small green fruit on the vine, but I fear I'll lose the plant to the cooling weather before we get any ripe fruit from it.


Hopefully I'll get some current photos posted soon so you can see how far we've come in only seven months!